
NetSuite
NetSuite provides a cloud-based ERP software suite. NetSuite is an integrated suite of applications for managing accounting, order processing, inventory management, production, supply chain, and warehouse operations.
Integration details
Integration Categories
- Financial System
- Expense Management
- HRIS
Authentication mechanism
- API
Discovery Capabilities
| Available entities | Product | Entity description | NetSuite resource |
|---|---|---|---|
| New services | EAM, SMP | Service discovery is the process of automatically identifying services and applications. All discovered services are added to LeanIX automatically. | Vendors |
| Invoices | SMP | Invoices discovery is the process to collect invoices from all services. All discovered invoices on the services are added to LeanIX automatically. | Transaction Search (all types with vendor information - e.g. VendorBill, PurchaseOrder, etc.) |
| Cost | SMP | Cost discovery is the process to identify every spending on all costs. All discovered costs on the services are added to LeanIX automatically. | ExpenseReport |
| Employees | SMP | Employees are discovered to get a complete overview of all employees of an organization and enrich the data for each discovered user. | Employees |
| Departments | SMP | Departments represent the organisational structure of an organization relate to employees. This data is used to identify where in the organization which SaaS is used. | Departments |
Information
A full vendor list is pulled at the time of integration and daily checked for any new vendors added to NetSuite. Invoices and expenses are pulled for 1 year - from the date when the service is discovered.
More info on the resources used
Data is pulled using SOAP version 2017_2 (see WSDL)
Set up NetSuite
Retrieve NetSuite Account ID
- Log in to NetSuite
- Navigate to Setup > Integration > SOAP Web Services Preferences (link)
- Copy and save your Account ID as shown below

Enable Web Services and Token-Based Authentication
- Navigate to Setup > Company > Enable Features (link)

- Select the SuiteCloud tab
- Under SuiteTalk (WebService) make sure SOAP Web Services are enabled
- Under Manage Authentication enable Token-based authentication

- Save the configuration
Create an Integration Role
We recommend creating a separate integration role-specific to the LeanIX integration. This integration role must have permissions to retrieve vendors, transactions (bills, purchase orders), and/or departments and employees. This integration role must have the ability to log in through web services. This role can then be assigned to the integration user.
- Navigate to Setup > User/Roles > Manage Roles > New (link)

- Enter role name “LeanIX Integration”, select accessible subsidiaries (if not sure, select all) and enable “Web Services only role”

- Under Permissions > Transactions, Permissions Lists and Permissions > Setup, add the permissions listed in the table below
Least privilege permissions
Not all permissions listed below are necessarily required for your integration. By default we will be pulling data for Financial System and Expense Management categories. For EAM this is additionally reduced to Vendors permission.
In case that you would like to pull also HRIS data please set the permissions accordingly and let your point of contact at LeanIX know.
| Sub-tab | Permission | Level | Integration Category |
|---|---|---|---|
| Transactions | Bills | View | Financial System |
| Transactions | Purchase Order | View | Financial System |
| Transactions | Find Transaction | View | Financial System |
| Transactions | Credit Card | View | Expense Management |
| Transactions | Expense Report | View | Expense Management |
| Lists | Vendors | View | Financial System |
| Lists | Expense Categories | View | Expense Management |
| Lists | Employees | View | HRIS |
| Lists | Employee Record | View | HRIS |
| Lists | Departments | View | HRIS |
| Lists | Currency | View | any |
| Setup | SOAP Web Services | Full | any |
| Setup | View Login Audit Trail | Full | any |
- Save the new role
Querying of VendorBills and Expenses
Please note that if some permissions to resources (e.g. VendorBills, Expenses) are not provided by your, the integration will still work and query all invoices via the "Transaction Search" of NetSuite, however we might not get the full set of data that could be insightful for LeanIX. Please get in touch with your CSM and/or our Support team if you think this is the case.
Create an Integration User
Once you've set up our integration role (LeanIX integration), you need to assign this role to your integration user. We recommend creating a separate user for your integrations.
- Navigate to Lists > Employees > Employees > New (link)

- Enter a new user name “LeanIX Integration User”

- Scroll down to the Access section and check “GIVE ACCESS”
- Assign the newly created role (LeanIX integration)

- Save the new user
Create an Integration Record
You need to create an integration record to represent the LeanIX application connecting to NetSuite.
- Go to Setup > Integration > Manage Integrations > New (link)

- Add a name for this integration “LeanIX Integration”
- Select Enabled in the State picklist
- Check the Token-based Authentication checkbox on the Authentication subtab
- Save this integration
- Now that we have created an integration record, save the consumer key and consumer secret. You’ll enter this into LeanIX to connect to NetSuite later
Create Access Token
The next step is to create an Integration record in NetSuite and generate the authentication information needed to allow LeanIX to integrate.
- Go to Setup > Users/Roles > Access Tokens > New (link)

- Select the integration record, integration user, and role we created earlier.
- Save the newly created access token.
- Save the token ID and token secret somewhere and keep it confidential - these will not
be retrievable again from NetSuite. You’ll enter a token ID and token secret into LeanIX to connect to NetSuite later.
Integrate NetSuite in LeanIX
- Log into LeanIX
- In LeanIX SMP navigate to Account Settings > Discover Integrations, find NetSuite and click Add
- Enter Account ID, Consumer Key, Consumer Secret, Token ID, and Token secret
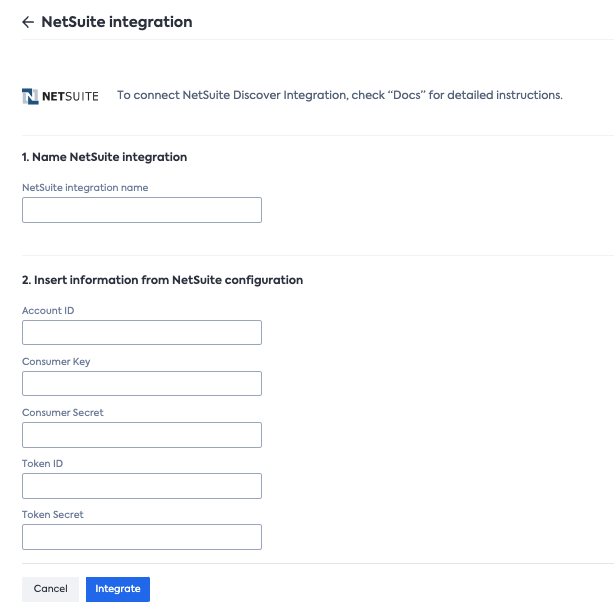
- Click Integrate
Updated about 1 year ago